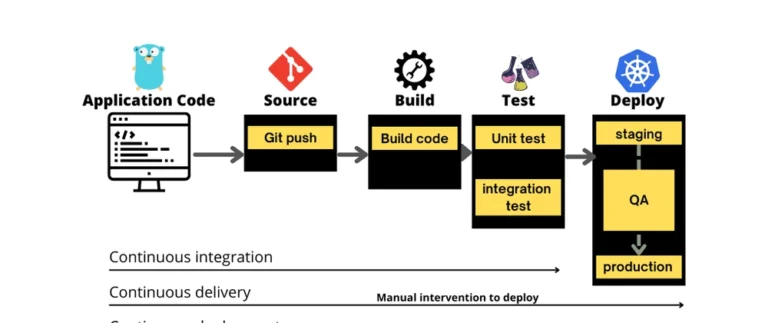
In today’s fast-paced development world, manually testing and deploying code simply doesn’t cut it anymore. CI/CD (Continuous Integration and Continuous Deployment) has become the gold standard for modern web development, acting as your automated quality assurance and delivery team.
CI/CD is A system that automatically test your web project and deploy them. Instead of manually running tests and uploading files, the system does it for you, automatically detecting errors and seamlessly deploying updates.
In this article, we will run through setting up a CI/CD pipeline from the start, using simple easy-to-follow steps.
Understanding CI/CD and Why It Matters
CI/CD functions as an advanced coding partnership that assists programmers in their tasks. The tool automates monotonous work to free developers to produce excellent code.
● Continuous Integration (CI)
The CI system conducts automatic problem verification operations whenever your team provides new code. It runs tests, checks for style errors, and makes sure everything still works. This prevents bugs from piling up and keeps your project stable.
● Continuous Deployment/Delivery (CD)
After successful testing, the CD system deploys code automatically to either test server staging or directs it to your production website for more manual uploads or messy FTP transfers.
Why Use CI/CD?
- Catches bugs early – Tests run before code goes live.
- Speeds up development – No waiting for manual checks.
- Reduces human error – Every file upload is now automated to remove the risk of human error.
- Makes teamwork smoother – Everyone’s modifications are smooth.
The UK Advantage: Scaling Teams with CI/CD
The tech industry in the UK generates more than £1 trillion in digital economy value each year. Teams now spread out across cities like Manchester, Edinburgh and London. But this growth creates a big problem: keeping code good when people work far apart. CI/CD fixes this by checking everything automatically – no more “it worked on my computer” excuses.
For a web development company in UK , these systems change everything. They make sure updates work the same whether your team is in Leeds, Bristol or working from home.
What You Need Before Getting Started
Before building your CI/CD pipeline, you’ll need a few basics:
A Code Project
This could be a Node.js app, a Python website, a PHP project, or anything else. As long as it’s code, CI/CD can handle it.
Basic Command Line Knowledge
You should know how to:
- Run basic commands (npm install, git push)
- Navigate folders (cd, ls)
A Place to Deploy
You’ll need a server to host your project. Some popular options:
- Vercel/Netlify (for static sites)
- Heroku (easy for beginners)
- AWS/Azure (for larger projects)
Optional but Helpful Tools:
- Docker – Keeps environments consistent.
- Testing frameworks (Jest, Pytest, Cypress) – For automated tests.
How CI/CD Works – A Simple Breakdown
CI/CD functions as an assembly line that processes your programming code:
- You push new code → Like adding a new part to the assembly line.
- Automated tests run → The system checks if the part fits.
- If tests pass, it deploys → The part gets added to the final product.
The CI Phase: Testing & Building
- Automated tests – Checks for bugs, style errors, and broken features.
- Build process – Prepares your code for deployment (e.g., minifying CSS/JS).
The CD Phase: Deployment
- Staging deployment – Sends code to a test server first.
- Production deployment – If everything looks good, it goes live.
Choosing the Right CI/CD Tools
There are two main types of CI/CD tools:
Cloud-Based (Easiest for Beginners)
- GitHub Actions – Built into GitHub, great for small to medium projects.
- CircleCI – Fast and flexible, works with many platforms.
- AWS CodePipeline – Best if you’re already using AWS.
Self-Hosted (More Control, More Work)
- Jenkins – The old reliable, but requires setup.
- Argo CD – Great for Kubernetes-based apps.
Recommendation: If you’re just starting, GitHub Actions or GitLab CI/CD are the easiest choices.
The Ultimate Step-by-Step CI/CD Setup Guide
Step 1: Set Up Git & Your Repository
- Sign Up for a GitHub or GitLab account.
- Upload your project using Git:
git init
git add .
git commit -m “First commit”
git remote add origin YOUR_REPO_URL
git push -u origin main
- Use branches wisely – Keep main for production and dev for testing.
Step 2: Configure the CI Pipeline
- Add a test script (e.g., npm test for Node.js).
- Create a CI config file (e.g., .github/workflows/ci.yml for GitHub Actions).
- Example GitHub Actions file:
name: CI Pipeline
on: [push]
jobs:
build:
runs-on: ubuntu-latest
steps:
– uses: actions/checkout@v2
– run: npm install
– run: npm test
Step 3: Configure the CD Pipeline
- Deploy to staging first (to test changes).
- Set up auto-deploy to production (after manual approval).
- Example Heroku deployment:
deploy:
needs: build
runs-on: ubuntu-latest
steps:
– uses: actions/checkout@v2
– run: git push heroku main
Step 4: Add Monitoring & Alerts
- Slack/email notifications – Get alerts if builds fail.
- Error tracking – Use tools like Sentry to catch bugs in production.
Best Practices for a Reliable CI/CD Pipeline
- Keep Builds Fast – Only test what’s necessary.
- Use Caching – Speed up repeated tasks (e.g., npm install).
- Secure Your Pipeline – Store passwords/API keys safely (use secrets).
- Test in Small Steps – Run unit tests before integration tests.
- Plan for Rollbacks – If something breaks, revert quickly.
Troubleshooting Common Issues
- Build fails? Check logs for missing dependencies.
- Tests flaky? Make sure they run consistently.
- Deployment stuck? Verify server permissions.
Conclusion
Setting up CI/CD might seem complex at first, but once it’s running, it’s a game-changer. For any web design agency London, this means less time debugging and more time creating stunning sites that impress clients
Start small—try automating tests first, then add deployment later. Soon, You will eventually wonder how you used to work without this innovation!

